AirPods are among the most popular wireless earbuds today, but many people struggle with connecting them to their laptops. Whether you have a Windows laptop or a MacBook, this guide will walk you through the easy steps on how to connect AirPods to laptop without any hassle.
Why Connect AirPods to Your Laptop?
Using AirPods with a laptop offers several benefits:
- Wireless convenience – No tangled wires.
- High-quality sound – Enjoy crisp audio while working, studying, or gaming.
- Easy switching – Seamlessly move between devices.
Now, let’s go over how to connect AirPods to a laptop, step by step.
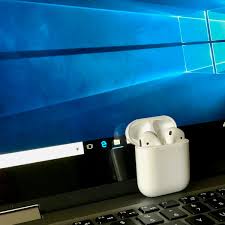
How to Connect AirPods to Laptop (Windows)
If you’re using a Windows laptop, follow these simple steps to connect your AirPods:
Step 1: Enable Bluetooth
- Click the Start Menu and go to Settings (gear icon).
- Select Devices, then click on Bluetooth & other devices.
- Toggle the Bluetooth switch to On if it’s not already enabled.
Step 2: Put AirPods in Pairing Mode
- Place both AirPods in the charging case.
- Open the case lid but keep the AirPods inside.
- Press and hold the button on the back of the case until the LED light flashes white.
Step 3: Connect AirPods to Laptop
- Click Add Bluetooth or other device in the Bluetooth settings.
- Choose Bluetooth.
- Select your AirPods from the list of available devices.
- Click Connect, and you’re done!
🎉 Your AirPods are now connected to your Windows laptop!
How to Connect AirPods to MacBook
For Mac users, the process is even simpler. Here’s how you can connect your AirPods to your MacBook:
Step 1: Turn on Bluetooth on Mac
- Click the Apple logo in the top-left corner of your screen.
- Select System Preferences, then click Bluetooth.
- Ensure that Bluetooth is turned on.
Step 2: Put AirPods in Pairing Mode
- Open the AirPods case without removing the earbuds.
- Press and hold the button on the back until the LED flashes white.
Step 3: Connect AirPods to Mac
- In the Bluetooth settings, look for your AirPods under “Devices.”
- Click Connect, and your AirPods will be paired with your MacBook.
✅ Done! Now you can enjoy wireless audio on your Mac.
Troubleshooting: AirPods Not Connecting to Laptop?
If you have trouble connecting your AirPods to a laptop, try these fixes:
1. Restart Bluetooth
Turn Bluetooth off and back on, then retry pairing.
2. Forget & Reconnect AirPods
- Go to Bluetooth settings.
- Click on your AirPods and select Forget device.
- Try reconnecting using the steps above.
3. Charge Your AirPods
Low battery can cause connection issues. Ensure your AirPods are charged.
4. Update Bluetooth Drivers (Windows Only)
- Open Device Manager.
- Find Bluetooth drivers.
- Right-click and select Update Driver.
If nothing works, try restarting your laptop and AirPods.
Final Thoughts
Learning how to connect AirPods to a laptop is simple once you follow the correct steps. Whether you’re using a Windows laptop or a MacBook, you can easily pair your AirPods and enjoy seamless, high-quality wireless audio.
If this guide helped you, let us know in the comments! 👍
FAQs
1. Can I connect AirPods to a laptop without Bluetooth?
No, AirPods require Bluetooth to connect to any laptop.
2. Why won’t my AirPods connect to my laptop?
Check if Bluetooth is turned on, ensure AirPods are in pairing mode, and update Bluetooth drivers.
3. Can I use AirPods as a mic on my laptop?
Yes! AirPods have a built-in mic that works with laptops.
4. Do AirPods work with all laptops?
Yes, as long as the laptop has Bluetooth support.
5. Can I connect AirPods to two devices at the same time?
Yes! Apple’s Automatic Switching allows AirPods to connect between Apple devices. However, for Windows, you need to disconnect and reconnect manually.